It's been a while since I've written anything about the Megapixels picture processing. The last post still showcases the old GTK3 version of Megapixels even!
In the meantime users figured out how to postprocess the images better to get nicer results from the PinePhone camera. One of the major improvements that has landed was the sigmoidal contrast curve in ImageMagick.
convert img.tiff -sharpen 0x1.0 -sigmoidal-contrast 6,50% img.jpgThis command slightly sharpens the image and adds a nice smooth contrast curve to the image. This change has a major issue though, this is a fixed contrast curve added to all images and it does not work that great for a lot of cases. The best result was running this against pictures that were taken with the manual controls in megapixels so they have the right exposure.
On the PinePhone the auto exposure in the sensor tends to overexpose images though. Adding more contrast after that will just make the issues worse. In the header image of this post there's three images shown generated from the same picture. The first one is the unprocessed image data, the second one is the .jpg created by the current version of Megapixels and the third one is the same data with my new post-processing software.

This screenshot shows the waveform of the same header image. This visualizes the distribution of image data on the horizontal axis it's the horizontal position of the image and on the vertical axis it's the brightness of all the pixels in that column plotted. Here you can still see the 3 distinct images from the header image but with different distribution of the color/brightness data.
One of the main issues with the data straight from the sensor is that it's mostly in the upper part of the brightness range, there's no data at all in the bottom quarter of the brightness range and this is visible as images that have no contrast and look grayish.
The sigmoidal contrast curve in the middle image takes the pixels above the middle line and makes them brighter and pixels below the middle line and makes them darker. The main part that's improving is the data extending further in the lower part here, but due to the curve the bright parts of the image become even brighter and the top line shows that the data is clipping.
The third image with the new algorithm instead moves the data down by keeping the bright pixels in the same spot but "stretching" the image to the bottom. This corrects for the blacklevel of the sensor data and also creates contrast without clipping the data.
How
This started with me trying to make the postprocessing faster. Currently the postprocessing is done with a shell script that calls various image manipulation utilities to generate the final image.

Megapixels will take a burst of pictures and saves those as seperate .dng files in a temporary directory. From that series the second one is always used and the rest is ignored. With dcraw the image will be converted to rgb data and stored as tiff. Imagemagick will take that and apply the sharpness/contrast adjustment and save a .jpg
Because these tools don't preserve the exif data about the picture exiftool is ran last to read the exif from the original .dng files and save that in the final .jpg
Importing and exporting the image between the various stages is not really fast, and for some reason the processing in Imagemagick is just really really slow. My plan was to replace the 3 seperate utilities with a native binary that uses libraw, libjpeg, libtiff and libexif to deal with this process instead.

The new tool is postprocessd (because it's supposed to run in the background and queue processing) It uses libraw to get rgb data, this is the same library that's used in dcraw. Then the resulting data is written directly to to libjpeg to create the final jpegs without any processing in between. This is what actually generated the first image shown in the banner. Processing a single .dng to a .jpg in this pipeline is pretty fast compared to the old pipeline, a full processing takes 4 seconds on the PinePhone.
The downside is that the image looked much worse due to the missing processing. Also just having a bunch of .jpeg files isn't ideal. The solution I wanted is still the image stacking to get less noise. With the previous try to get stacking running with HDR+ it turned out that that process is way way way too slow for the PinePhone and the results just weren't that great. In the meantime I've encountered https://github.com/luigi311/Low-Power-Image-Processing which uses opencv to do the stacking instead. This seemed easy to fit in.

This new code takes all the frames and converts them with libraw. Then the opencv code filters out all the images that are low contrast or fully black, because sometimes Megapixels glitches out. The last .dng file is then taken as a reference image and all the other images are aligned on top of that with a full 4 point warping transform to account for the phone slightly moving between taking the multiple pictures. After the aligning the pictures are averaged together to get a much less noisy image without running an actual denoiser.
This process produced an image that's exactly the same as the output files from v1 but with less noise.

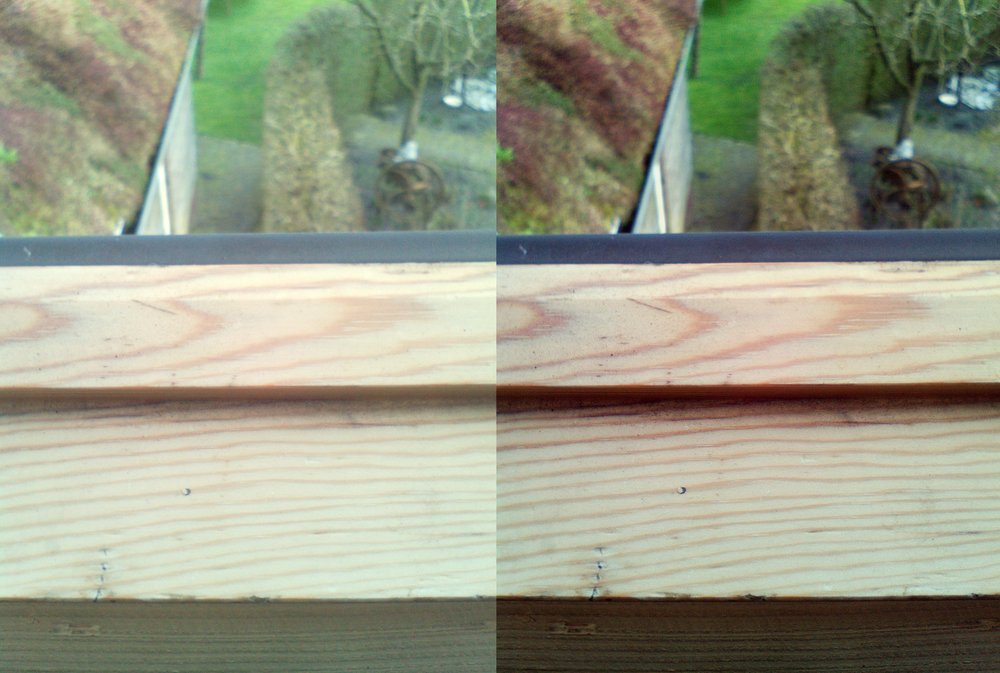
This is a zoomed in crop of a test image that shows the difference of noise. The results are amazing for denoising without having artifacts that make the image blurry. But for every upside there's a downside. This is very slow.
Stacking 2 images together with the current code takes 38 seconds. For great results it's better to stack 2 images though.
Color processing
Now the opencv dependency is added it's pretty easy to just use that to handle the rest of the postprocessing tasks.

The main improvement here is the automatic blacklevel and whitelevel correction. The code slightly blurs the image and then finds the darkest and brightest point. Then it's simply substracting the value of the darkest point to shift the colors in the whole image down and the colored haze is removed. Then the pixels get multiplied with a calculated value to make the brightest pixel pure white again which "stretches" the brightness range so it fills the full spectrum. This process adds the contrast like the old imagemagick code did, but in a way more carefully tuned way.
After this a regular "unsharp mask" sharpening filter is run that's fairly agressive, but tuned for the sensor in the PinePhone so it doesn't look oversharpened.
A last thing that's done is a slight gamma correction to darken the middle gray brightness a bit to compensate for the PinePhone sensor overexposing most things. The resulting contrast is pretty close to what my other Android phones took, except the resolution for those phones is a lot better.
What's left to do
The proof of concept works, now the integration work needs to happen. The postprocessing is quite CPU intensive so one of the goals of postprocessd is to make sure it never processes multiple images at the same time but instead queues the processing jobs up in the background so the CPU is free to actually run Megapixels. There's also still some bugs with the exif processing and the burst length in the current version of Megpixels is a bit too short. This can probably be made dynamic to take more pictures in the burst when the sensor gain is set higher.