
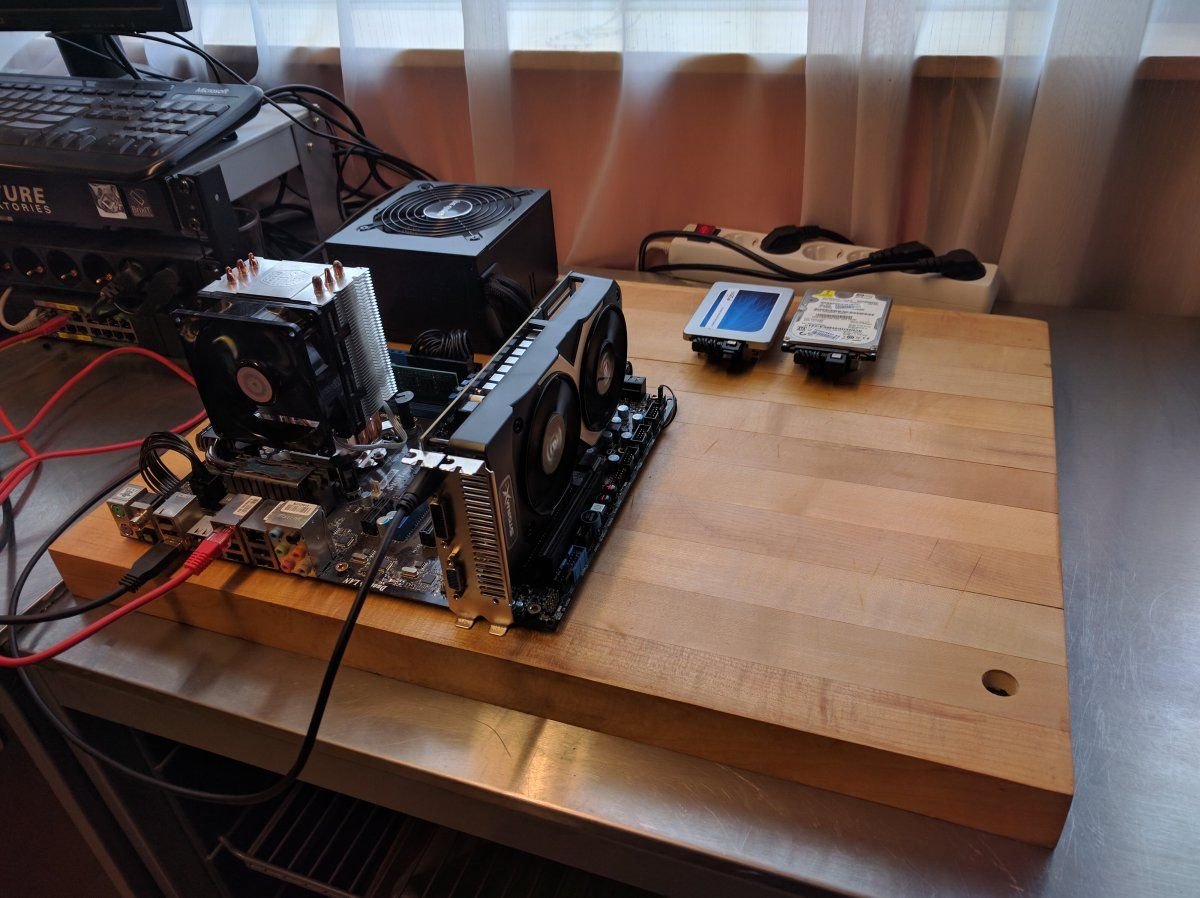
A few months ago I got the idea to build a wall mounted art/computer thing after seeing a picture of someones
watercooling setup mounted to a wall. As base for my build I used my office computer. It's a old MSI board
(P55-GD65) with a first generation Intel Core i7 860. I've connected an SSD to it and it's as fast as the
zenbook I use on the go. Fast enough.
The full specs.
- Intel Core i7 860 @ 2.8 Ghz (4 cores with hyperthreading)
- MSI P55-GD65 mainboard
- 8GB DDR3
- Nvidia GeForce 750 Ti
- Crucial BX200 480GB SSD
- Maple cutting board
The board preparation
I've found a (very) old cutting board at the attic from my parents. It's a very heavy maple cutting board
that's never used because they've dropped it and the top three planks broke off.
I laid out the general layout of the parts on the board and drawed the required holes for the fires.
I put the holes as much under the parts as possible and let the wires come from underneath the parts themselves.
After drilling the holes I sanded down the top to remove the big scratches and the markings I drew on. After
drilling the holes I routed out a lot of spaces on the back for the cables. The boards are oiled with danish oil
after that which hides the very small scratches left after sanding.


The next problem is figuring out how to actually mount the parts to the board. This is a long way of using
the supplied screws to mount the parts in the housing following the ATX specifications.
The first part I mounted is the power supply. There are no screw holes on the side I wanted it mounted and
it's not a great idea opening up the power supply and put conducting screws in it. The solution I settled on
is using velcro to mount the it. This way I can completely hide the mounting and still have the power supply
easily removable.
I've used some actual velcro® instead of the chinese knockoff stuff I normally use. My experience with the
chinese stuff is that the glue on the back of the velcro stops working after a few days which is really bad
in this situation since the power supply is mounted above the large cpu cooler. If it falls it wil probably
snap the cpu part from the mainboard.
As a test I put the power supply on the board in roughly the right spot and had it hanging for a few days.
The official velcro stuff doesn't seem to come of so I continued building the PC.

Putting it all together
After I confirmed the PSU won't drop I put the final build together. This was on a sunday which
is was slightly problematic since I didn't have the correct spacers for the mainboard and no stores
(nearby) were open.
The spacers I ended up using are some nuts that are sanded down to not short contacts underneath the mainboard.
The rest of the build is cable management and cutting cables. I didn't use a modular power supply since
those aren't modular enough or have the wrong connectors on the wrong cables. I used a cheap power supply
and just removed the connectors that aren't used. On the end of the two sata/molex power cables is an old
molex connector (technically every connector on the power supply is a molex connector). Those aren't needed
so I cut them off.
I also only needed only two sata power connectors so I removed the other connectors on the cable by simply
snapping them off.
The last thing I removed is the GPU power connector since this is my office computer and I won't need a
GPU that needs more than 75 watt to function.


That's about everything about the build. The storage drives are put on a spacer so they float above the
cutting board so the cables can vanish underneath them. The drives are also mounted with velcro so they are
easy to swap if needed.
The only thing that hasn't been done yet is installing the power button (the last hole left on the cutting
board) and mounting the board on a wall.
I also want to move the GPU to the space to the side of the mainboard with a PCIe riser cable but for that
I need a better and more expensive riser cable from molex (~$80) instead of the cheap ribbon cable from ebay
that I tried it with.


